

Creating great patient experiences starts the moment someone joins your practice. But keeping that consistency without adding more admin? That’s where automation shines.
Using Dentally, Zapier and Mailchimp, you can set up a simple, automated workflow that sends new patients a welcome email (or a full series) without lifting a finger. Here's exactly how to do it.
Why automate your welcome emails?
An automated email series helps you:
- Quickly build relationships with new patients.
- Share useful information about your practice.
- Introduce your team and treatments.
- Save admin time and reduce repetitive tasks.
With this integration, when you register a new patient in Dentally, Zapier automatically adds them to your Mailchimp mailing list - triggering your welcome email campaign.
What do you need to get started?
There are three things you need to set up the workflow:
- Dentally – Your practice management software.
- Zapier – To connect Dentally with your email platform.
- Mailchimp – To create and send your welcome email(s).
The core logic is simple; when a new patient is created in Dentally, Zapier sends their details to Mailchimp and Mailchimp sends them their email.
How do you set this up, step-by-step?
Step 1: Create Your Mailchimp Automation
Before connecting anything, set up your welcome email series in Mailchimp.
- First, make sure you have a Mailchimp audience list (e.g. called “Patients”).
Then go to the ‘Automation’ tab and click ‘Create Automation Workflow’.

Choose the 'Welcome Series' workflow option.
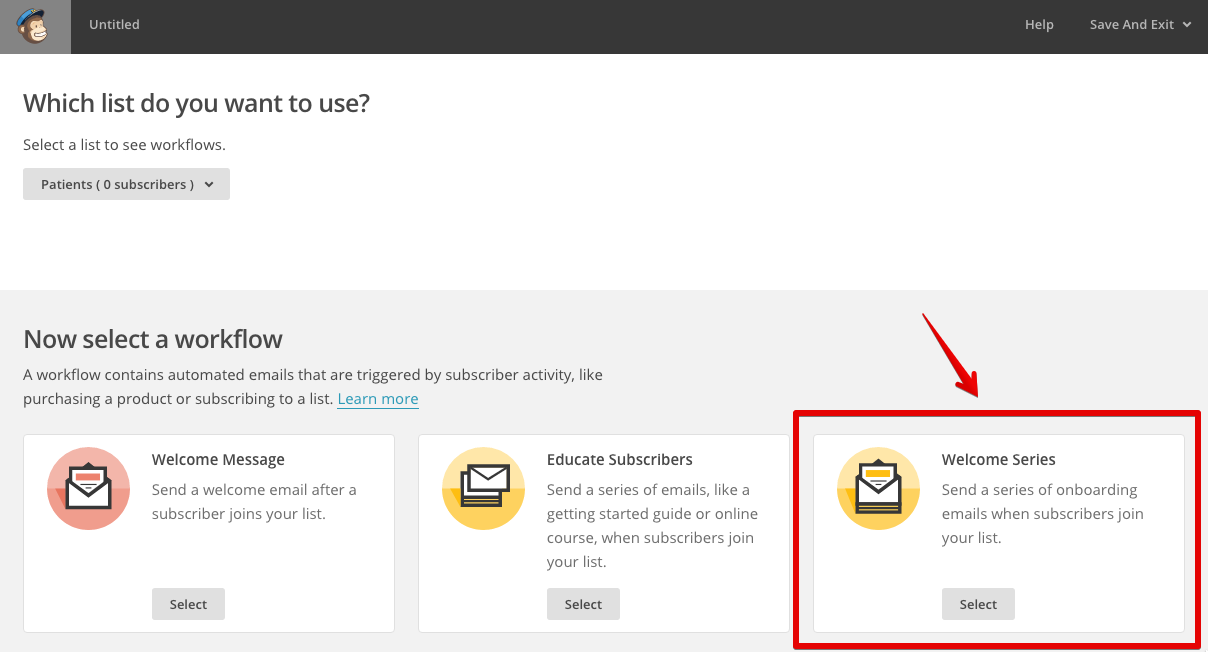
Now it's time to set up the basics of your campaign. In the 'Emails' section, add the emails you want to send, whether this is a series or a one-off welcome message. To space these out, simply change the delay for each one, for example select 'send one immediately' or 'one after 1 day'.
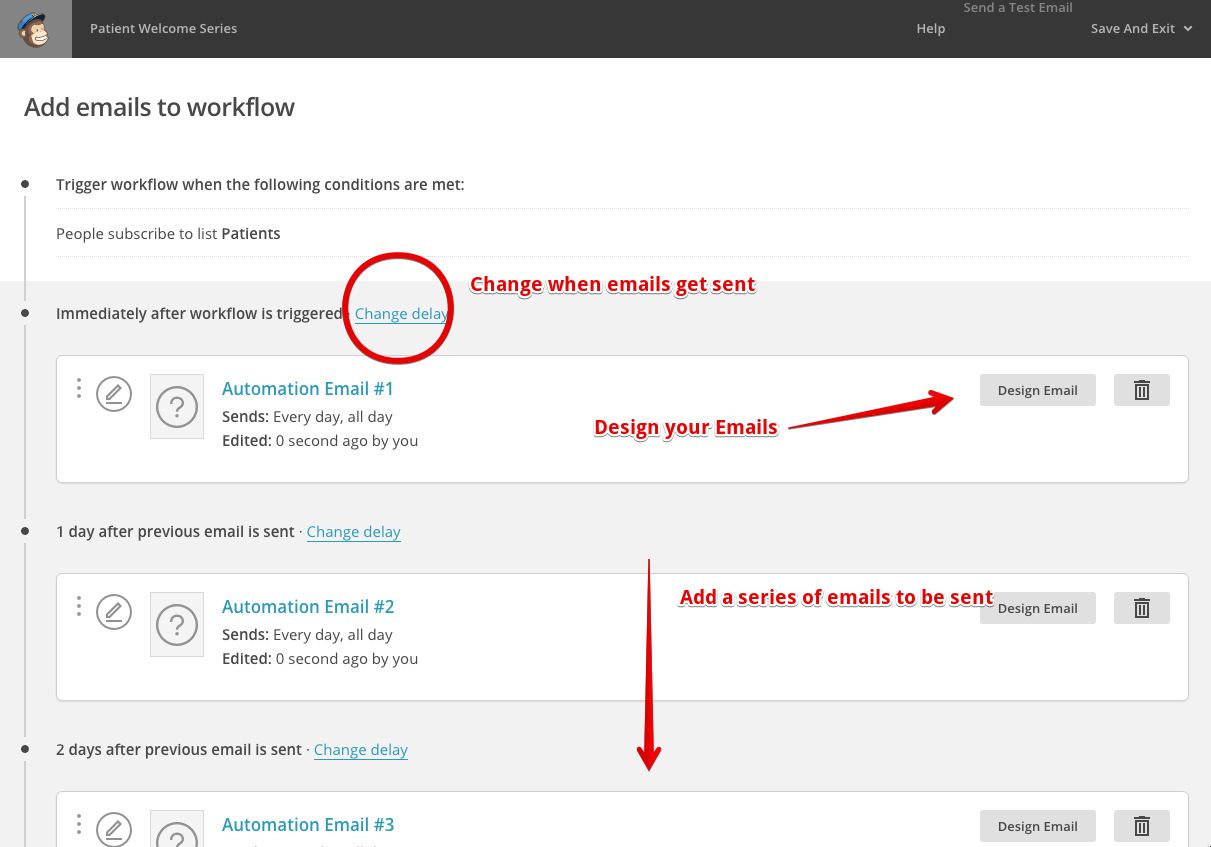
Hit confirm, and your automation workflow is live. Though it will only send emails once a new patient has been added to the list, this is where Zapier comes in.
Setting up Zapier
Hit ‘Confirm’ to activate your workflow.
This is where your welcome messages live. Zapier will trigger this workflow whenever a new patient is added.
2. Set up your Dentally–Zapier–Mailchimp Integration
Next, log in to your Zapier account.
- Go to the Dentally integration link (you may need to request access if it’s not public).
- Click "Make A Zap!" at the top.
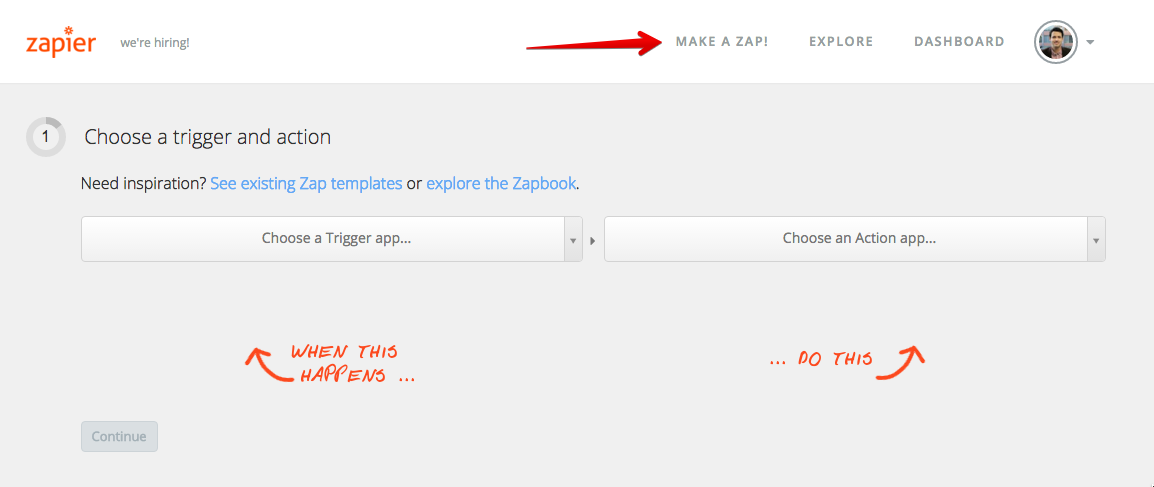
Now build your automation:
Trigger App: DentallyTrigger: New Patient
Action App: Mailchimp
Action: Add Subscriber
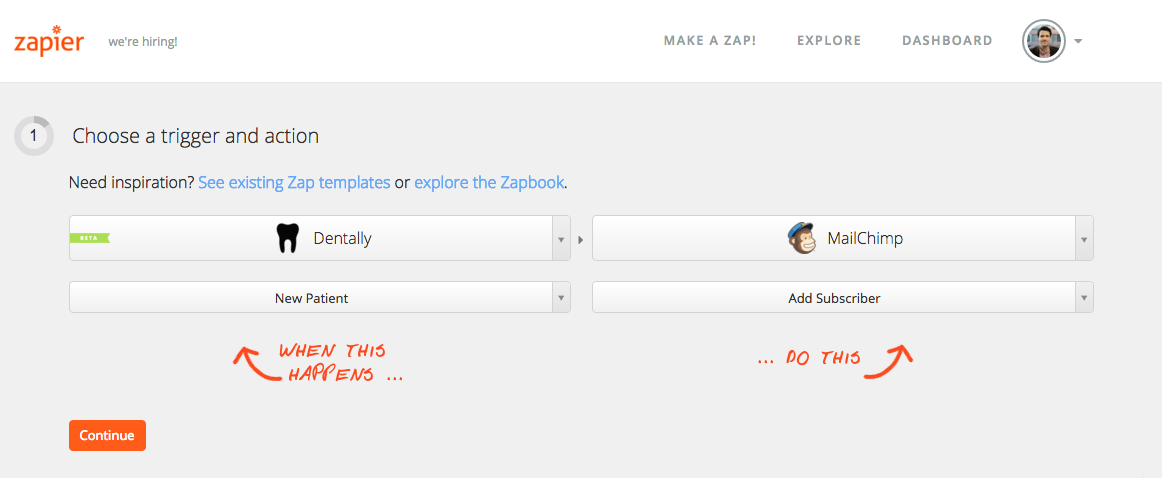
After you have selected both Dentally and Mailchimp, select the trigger below Dentally and set it to 'New Patient'.
Do the same for Mailchimp but choose 'Add Subscriber' then click 'Continue'.
Now it is time to connect both of your accounts to Zapier. Click to add a connection do you Dentally account, this will bring up a new window asking you to log in to Dentally.
Log in with both your Dentally account and your Mailchimp account and make sure it says 'Account is working'.

This tells Zapier that whenever a new patient is created in Dentally, it should automatically add them to your Mailchimp list.
3. Connect your accounts
Zapier will prompt you to log in and connect both:
- Your Dentally account.
- Your Mailchimp account.
Once connected, Zapier will show a green tick next to each account with the message “Account is working”.

4. Map the patient data fields
Zapier will now ask you to match the patient fields from Dentally to Mailchimp.
You’ll need to:
- Select the correct Mailchimp list (the same one linked to your welcome series).
- Map the Email field from Dentally to the email section.
- Map the First Name and Last Name fields as well.
This ensures new patients are correctly added to your audience and receive emails with personalisation.
5. Test and activate the workflow
Before going live, run a quick test:
- In Dentally, create a test patient.
- In Zapier, click ‘Test this Zap’ and select your sample patient.
- Check your Mailchimp list - your test patient should appear.
- Once confirmed, name your Zap (e.g. “New Patient Welcome Emails”) and switch it on 🎉
.png?width=600&height=534&name=Create-New-Zap---Zapier-2015-10-30-13-09-00%20(1).png)
That's how to simply connect Dentally and Zapier to an email tool so you can manage a series of automated marketing emails - plus you can now present information to your new patient in a professional and branded manner.
Save time and admin while enhancing the patient experience before they even step through your doors. Need help? Visit our help centre or get in touch with support.
📩 hello@dentally.com
Photo by Steve Jurvetson